H2O engineers continually innovate and introduce new techniques by adopting latest research, working on cutting edge use cases, and participating in and winning machine learning competitions like Kaggle. But thanks to explosion of AI research and applications even
most advanced automated machine learning platform like H2O.ai Driverless AI can not come with all bells and whistles to satisfy every
data scientist out there. Which means there is that feature or algorithm that customer may be wanting and not yet finding in H2O docs.
Having that in mind H2O engineers designed several mechanisms to help data scientists lead the way with Driverless AI instead of waiting or looking elsewhere. The idea is to enable users to extend functionality with little (or possibly more involved) effort by integrating into Driverless AI workflow and model pipeline. These are the mechanisms that accomplish such goals:
- experiment configuration profile
- transformer recipes (custom feature engineering)
- model recipes (custom algorithms)
- scorer recipes (custom loss functions)
- data recipes (data load, prep and augmentation; starting with 1.8.1)
- Client APIs for both Python and R
This post will explain what they mean, how they work, and will finish with more elaborate example of using R Client to enhance model analysis with visualizations.
Experiment Configuration
All possible configuration options inside Driverless AI can be found inside config.toml file (see here). Any experiment (experiment is a Driverless AI term for encompassing AutoML workflow resulting in complete model) can selectively override any option (as applicable) in Expert Settings using Add to config.toml via toml String entry limiting the scope to this experiment only.
For example, while Driverless AI completely automates tuning and selection of the built-in algorithms (GLM, LightGBM, XGBoost, TensorFlow, RuleFit, FTRL) it can not foresee all possible use cases or control and tune every parameter. So the following configuration settings let user customize parameters for each algorithm:
- LightGBM parameters: params_lightgbm and params_tune_lightgbm
- XGBoost GBM: params_xgboost and params_tune_xgboost
- XGBoost Dart: params_dart and params_tune_dart
- Tensorflow: params_tensorflow and params_tune_tensorflow
- GLM: params_gblinear and params_tune_gblinear
- RuleFit: params_rulefit and params_tune_rulefit
- FTRL: params_ftrl and params_tune_ftrl
Thus, to adjust architecture of TensorFlow models trained in your experiment use params_tensorflow:
params_tensorflow = "{'lr': 0.01, 'add_wide': False, 'add_attention': True, 'epochs': 30, 'layers': (100, 100), 'activation': 'selu', 'batch_size': 64, 'chunk_size': 1000, 'dropout': 0.3, 'strategy': 'one_shot', 'l1': 0.0, 'l2': 0.0, 'ort_loss': 0.5, 'ort_loss_tau': 0.01, 'normalize_type': 'streaming'}"
or to override LightGBM parameters params_lightgbm:
params_lightgbm = "{'objective': 'binary:logistic', 'n_estimators': 100, 'max_leaves': 64, 'random_state': 1234}"
or use params_tune_xxxx to provide a grid that limits or extends search of hyper parameter space per algorithm, e.g. for XGBoost GBM:
params_tune_xgboost = "{'max_leaves': [8, 16, 32, 64]}"
To add multiple parameters via Expert Settings use double double quotes ("") around the whole configuration string while separating parameters with new line (\n):
""params_tensorflow = "{'lr': 0.01, 'epochs': 30, 'activation': 'selu'}" \n params_lightgbm = "{'objective': 'binary:logistic', 'n_estimators': 100, 'max_leaves': 64}" \n params_tune_xgboost = "{'max_leaves': [8, 16, 32, 64]}"""
To confirm that settings took effect view experiment's log file (to access logs while experiment running see here or for completed experiment here) and find Config Settings section near top of the logs. Overridden settings should appear with asterisk and assigned values:
params_tensorflow                     *: {'lr': 0.01, 'epochs': 30, 'activation': 'selu'}
params_lightgbm                       *: {'objective': 'binary:logistic', 'n_estimators': 100, 'max_leaves': 64}
params_tune_xgboost                   *: {'max_leaves': [8, 16, 32, 64]}
Transformer Recipes
Starting with version 1.7.0 (July 2019) Driverless AI supports Bring Your Own Recipe (BYOR) framework to seamlessly integrate user extensions into its workflow. Feature engineering and selection make up significant part of the automated machine learning (AutoML) workflow and utilizes Genetic Algorithm (GA) and set of built-in feature transformers and interactions to maximize model performance. The following high-level and simplified view of Driverless AI AutoML workflow illustrates how pieces like GA, BYOR, model tuning fall together:
 |
| Figure 1. Driverless AI GA and BYOR workflow |
Still, variety of data and ever more complex use cases sometimes demand more specialized feature transformations and interactions. Using BYOR transformers (or transformer recipes) extends core functionality to include any transformations and interactions written in Python according to BYOR specification. Implemented in Python with access to any Python packages transformer recipes integrate into GA workflow to compete with built-in transformations and interactions.
Such fare competition inside Driverless AI is good for both models and users: models improve with better features and users take advantage of exchanging ideas and solutions in the form of recipes. With BYOR Driverless AI realizes democratization of AI that H2O.ai stands for. To start with custom transformers look for recipes found in public H2O BYOR repo in its transformer section: h2oai/driverlessai-recipes/transformers. For help and examples on creating your first recipe see How to Write a Transformer Recipe.
Model Recipes
XGBoost and LightGBM consistently deliver top models and carry most of transactional (i.i.d. data) and time series use cases in Driverless AI. Other workhorse algorithm delivering top models for NLP and multi-class use cases is TensorFlow. Still more algorithms - Random Forest, GLM, and FTRL - compete for the best model in Driverless AI (see Figure 1). This competition is not closed: BYOR framework lets any algorithm written in Python to the interface spec compete for the top positions on the leaderboard. Model recipes are classification or regression algorithms plugged into Driverless AI workflow, which in turn tunes and combines with them with powerful feature engineering and selection enabled by GA. Based on experiment accuracy setting Driverless AI either picks the best model or builds an ensemble from top models on the leaderboard. For examples of existing model recipes refer to h2oai/driverlessai-recipes/models.
Scorer Recipes
Often data scientists swear by their favorite scorer so Driverless AI includes large set of built-in scorers for both classification and regression. But we don't pretend to have all the answers and, again, BYOR framework allows to extend Driverless AI workflow to any scoring (loss) function. Being it from the latest research papers, or made to specific business requirements all that needs to be created per BYOR scorer interface spec. Rather representative and useful collection of scorers can be found in h2oai/driverlessai-recipes/scorers repository while tutorial on using custom scorers found in Driverless AI docs. Remember
that Driverless AI uses custom scorers in GA workflow to select
best features and models but not inside algorithms themselves where
it is likely not desirable.
Data Recipes
Starting with version 1.8.1 (December 2019) new BYOR feature - data recipe - was added to Driverless AI. The concept is simple: bring your Python code into Driverless AI to create new or manipulate existing datasets to enhance data and elevate models. Data recipes utilize data APIs, datatable, pandas, numpy and other third-party libraries in Python and belong to one of two types:
- producing data recipe creates one or more dataset(s) by prototyping connectors, bringing data in and processing it. They are similar to data connectors in a way they import and process data from external sources (see here);
- modifying data recipe creates one or more dataset(s) by transforming a copy of existing Driverless AI dataset (see here). Variety of data preprocessing (data prep) use cases fall into this category including data mungeing, data quality, labeling, unsupervised algorithms such as clustering, latent topic analysis, anomaly detection, dimensionality reduction, etc.
One important difference between data recipes and other BYOR kinds (transformer, model, and scorer) is relation to model scoring pipelines. While the latter integrate into Python scoring pipeline and sometimes into MOJO so they get deployed with models the former manipulate data prior to modeling workflow takes place and do not take part in scoring. For recipe specification see here and for various examples refer to h2oai/driverlessai-recipes/data repository.
Python Client
All Driverless AI features and actions found inside web interface are also available via Python Client API. See docs for instructions on how to install Python package with more examples here. For Driverless AI users who are proficient in Python scripting repeatable and reusable tasks with Python Client is next logical step in adopting Driverless AI automated workflow. Examples of such tasks are re-fitting on latest data, deploying scoring pipelines, executing business-driven workflows that combine data prep and Driverless AI modeling, computing business reports and KPIs using models, implementing Reject Inference method for credit approval, and other use cases.
R Client
Driverless AI R Client parallels functionality of Python Client and emphasizes consistency with R language conventions that appeals to data scientists practicing R. With access to unparalleled visualization libraries in R users can extend model analysis beyond already powerful tools and features found in Driverless AI user interface and Autoreport. Let's conclude with the example of using ggplot2 package based on The Grammar of Graphics by Leland Wilkinson (Chief Scientist at H2O.ai) and create Response Distribution Chart (RDC) to analyze binary classification models. RDC shows the distribution of responses (probabilities) generated by the model to assess quality of the model on a basis how well it distinguishes two classes (see 150 Successful Machine Learning Models: 6 Lessons Learned at Booking.com, section 6).
The process below shows full sequence of using R Client: how to connect, import, split data, run experiment that creates a model, score data, and finally plot RDC.
To start Driverless AI R client package needs to be installed by downloading it from the server:
 |
| Figure 2. Downloading Driverless AI Client R package |
|
After download completes RStudio lets you find and install package from its menu Tools -> Install Packages...
 |
| Figure 3. Installing dai package in RStudio |
With dai package installed every script begins by connecting to running Driverless AI instance (change its name, user id, and password):
For our example we will use infamous titanic dataset that I slightly enhanced and saved on both my local machine and in S3 bucket here. The following commands upload data file from local machine or from S3 into Driverless AI (pick one):
While H2O pipeline automates machine learning workflow including creating and using validation splits it is best practice to provide separate test set so that Driverless AI can produce out of sample score estimate for its final model. Splitting data on appropriate target, fold, or time column is built-in functionality:
Now we can start automated machine learning workflow to predict survival chances for Titanic passengers that results in complete and fully featured classification model:
If you login into Driverless AI you can observe just created model via browser UI:
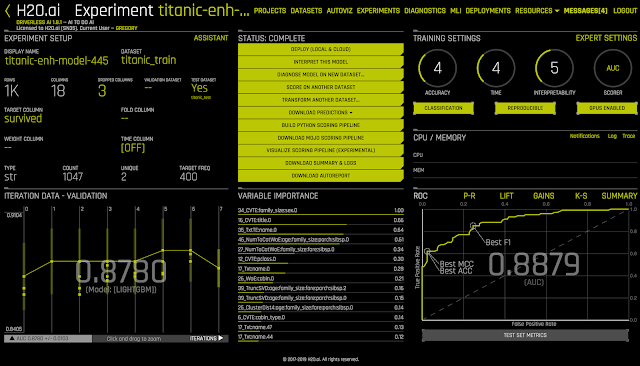 |
| Figure 4. Driverless AI in action |
Having Driverless AI classifier there are many ways to obtain predictions. One way is to download file with computed test predictions to client and then read it into R:
Because we want to use features from the model in visualizations there is a way to score dataset and attach hand picked features in results (scoring all Titanic data in this case):
At this point full power of R graphics is available to produce additional visualizations on the model with predictions saved to R data frame. As promised, we show how to implement the method of Response Distribution Analysis:
The method is based on the Response Distribution Chart (RDC), which is simply a histogram of the output of the model. The simple observation that the RDC of an ideal model should have one peak at 0 and one peak at 1 (with heights given by the class proportion). Source: https://www.kdd.org/kdd2019/accepted-papers/view/150-successful-machine-learning-models-6-lessons-learned-at-booking.com
First, we plot RDC on all data:
 |
| Figure 5. Cumulative RDC on titanic model |
Few more examples of RDC follow - first with separate distributions on survived and not survived passengers:
 |
| Figure 6. RDC by actual outcome |
Next plot compares RDC'es for male and female passengers:
 |
| Figure 7. RDC by passenger sex |
Finally, RDC's by port of embarkation:
 |
| Figure 8. RDC by port of embarkation |
Once again, H2O engineers continually innovate and introduce new techniques so chances are RDC may become another feature inside Driverless AI model diagnostics module. But this example would still llustrate how to enhance models with practically any type of analysis using R Client and visualizations.
Resources and References
- H2O.ai Driverless AI home page
- Driverless AI docs online
- Github project Recipes for H2O Driverless AI
- How to Write a Transformer Recipe for Driverless AI
- Driverless AI Scorers
- The Grammar of Graphics by Leland Wilkinson
- 150 Successful Machine Learning Models: 6 Lessons Learned at Booking.com
- GitHub Gist with source code for RDC visualization with R Client